Showing posts with label Recipe. Show all posts

Friday, June 26, 2020

Simple and Easy - Step-By-Step Instructions to Making Muah Chee #muahcheerecipe

Thanks to Singapore's circuit breaker, more people are cooking at home nowadays and many are sharing their recipes online! One recipe that was all the rage a month or two ago was the unassuming muah chee. 

Even my mom jumped on the bandwagon and i was super impressed with the muah chee she made! It was soft, doesn't stick to the teeth and easily the best i ever had. When i asked her about the recipe; i was dumbfounded as it was darn easy! 

Ingredients (6 persons)
Pandan Water - 3 Cups
Glutinous Rice Flour - 3 Cups
Shallot Oil - 3 Teaspoons
Peanut Powder - 1 Cup
Fine Sugar - 1 Cup

Step-By-Step Instructions
For this recipe, we shall be using glutinous rice flour from erawan brand which you can get from most supermarkets. At one point, it was out of stock as everyone was making muah chee! 

My mom decided to use pandan water as it would give the muah chee a nicer aroma. You may boil pandan leaves in plain water if you have time; if not, plain water would be fine.

Remember to sift the pandan water.

Three cups of pandan water to a non-stick pan. The recipe is easy to remember as ratio is 1 to 1; so it's like 1 cup of water to one cup of flour to one teaspoon of oil etc. 

Switch on the fire (low) and slowly mix in the glutinous rice flour. This is the part i don't quite get as i would have made my job easier by pre-mixing the glutinous rice flour to the water. But hey, mom is the chef here and it's best not to say too much when she's in charge of the kitchen. 

To prevent burning, constant stirring as you mix in the flour is necessary. My mom advised that the stir must be in one direction and not all over the place. Again, i reserve my comment as this is the same person who told me i cannot say the kueh is cooking beautifully in the steamer as it would eventually turn out ugly. 

When everything is more or less incorporated, put in the oil. While i understand that any vegetable oil is okay, my mom insisted on using shallot oil which usually does a wonderful job in enhancing the flavour.  

Continue stirring in one direction (clockwise / anticlockwise); the mixture would get lumpy and if i haven't seen it with my own eyes, the usual me would think the recipe has failed and proceeded to dump the whole thing into the dustbin.

About six minutes later, the muah chee texture had formed but please do not assume that this is the ripe time to remove the sticky dough! You might notice speckles of whiteness in the dough which are telltale signs that the mixture wasn't 100% cooked.
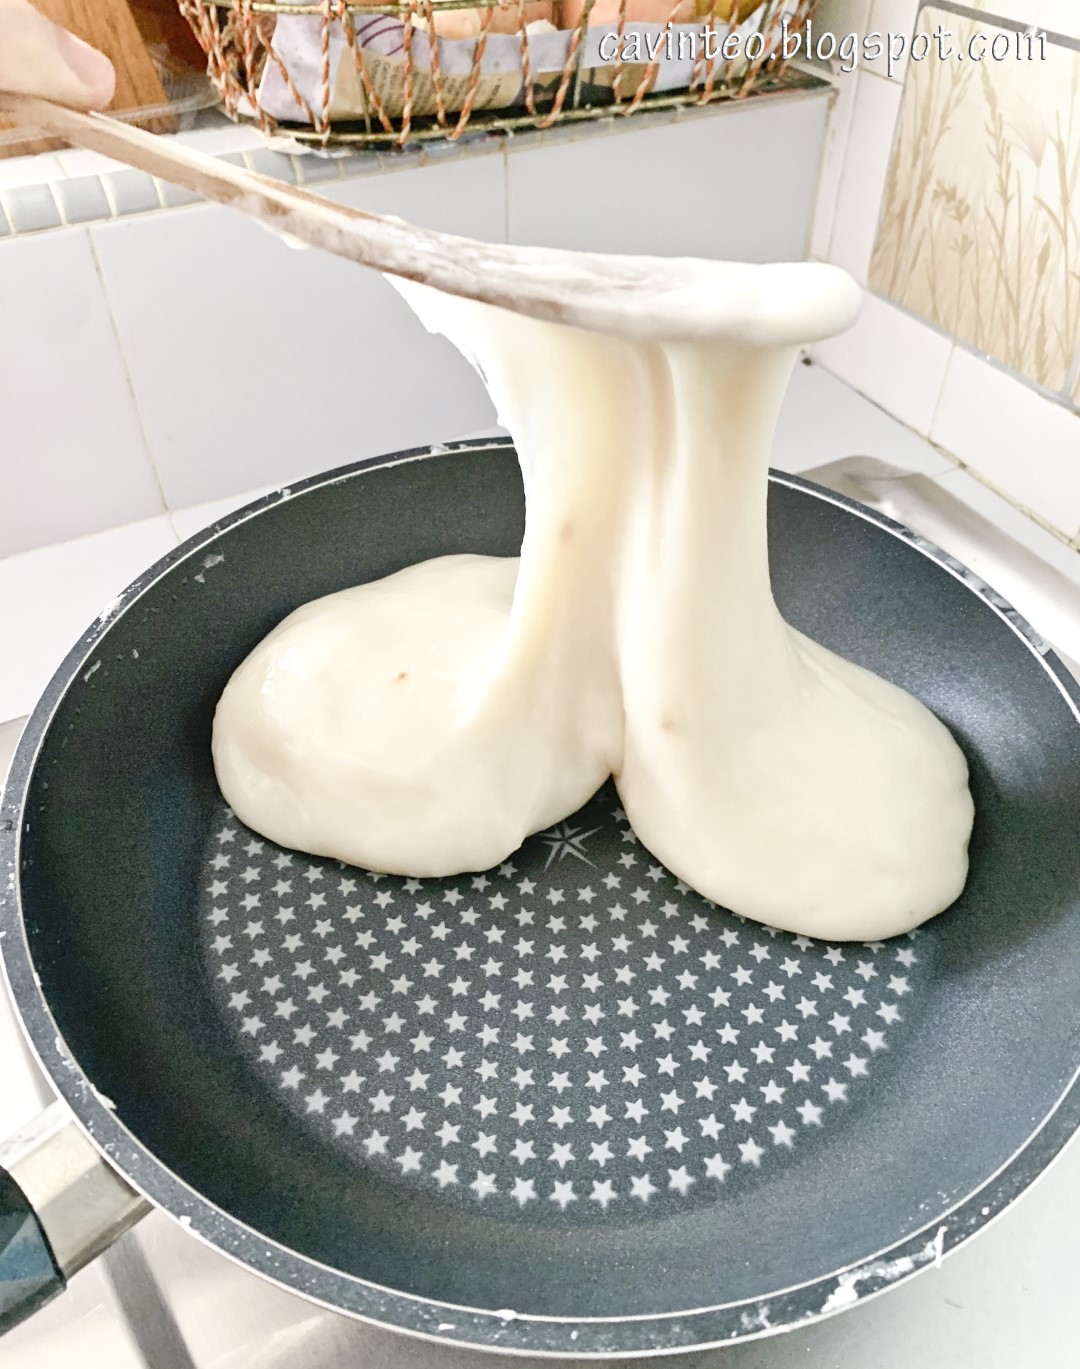
Wait until all the whiteness are gone and you are able to stretch the dough for about one or two feet before it breaks. Switch off the fire and proceed to prepare the essential companion of muah chee.

Peanut powder! Another alternative, for those who have allergy towards peanuts, would be black sesami powder. You can experiment with other nuts but peanut and black sesame would be the most common. 

One cup of peanut powder mixed in with one cup of fine sugar. You may cut down accordingly so long you keep to the one to one ratio although those who prefer less sweet may reduce the sugar further.

Oil your scissors so that the cooked dough wouldn't stick to it. Don't want to waste time washing your good pair of scissors? You can use a spoon too! 

The way to eating muah chee is to divide the dough into small pieces and then coat them with the peanut-sugar mixture. And unlike them you buy from the stalls, you can decide for yourself how big or small you want the pieces to be! 

Max satisfaction! 

Saturday, September 21, 2019

Traditional Mooncake Baking - Penning Down The Recipe For Future References #mooncakerecipe #traditionalmooncake

Strangely, i was never a big fan of traditional mooncakes until i am in my 30s. And now that i have moved to my own humble abode, i had taken up the task of baking my own mooncakes with the fool-proof recipe from Ms Jeannie Tay

Do click here for her original recipe! I decided to post one of my own today as there are some small steps / process that could be different (like the Osmanthus Jelly with Red Dates & Chinese Wolfberries) and it's safer to pen here in this blog, rather than on paper. 

Ingredients
Dough
- Golden Syrup (350 grams)
- Alkaline Water (10 grams)
- Peanut Oil (125 grams)
- Plain Flour (500 grams)

Filling 
- Paste (1 kilogram)
- Melon Seeds (Depends on your Preference)
- Salted Egg Yolk (Optional)

Egg Wash
- Egg Yolks (Two)
- Milk (Two Tablespoons)
- A bit of sesame oil

Ratio
Large Mooncake - Dough (50 grams) / Filling (125 grams)
Piggy Mooncake - Dough (15 grams) / Filling (15 grams) 

Method
Put the golden syrup, alkaline water and peanut oil in a bowl and stir with a whisk. The colour would initially be a bit milky but what you really want is to get a honey-like consistency. 

Pour the mixture into the plain flour. From the above photo, it seems like there's a lot of flour and that's because i usually make larger batches that's double the recipe i am sharing here. 

Attach the paddle attachment and let the mixing begin! 

There's no hard and fast rule on how long the mixing would take as it depends on the mixer you have. I also play by ear most of them; so long the mix is combined, i would be fine. There were times when i had to stop and use a spatula to scrape the bottom and the side.

Being a stingy person, i had to take the extra effort to ensure i could remove most of the sticky mix from the paddle and that's a chore! 

Shape the dough by the pressing and smoothing the mixture with the spatula. I find a typical spatula to be quite restrictive in their movement and got the Joseph Joseph's bowl scraper; p.s. absolutely didn't regret my purchase.

Cover with a cling wrap and leave the dough to rest for two hours. Why? Because the current mixture would be too sticky for you to mold. Leaving it to rest make it a lot pliable for 'hand manipulation'.

Optional - if you like salted egg yolks in your mooncake, the two-hour rest would be a good time for you to steam the yolks. I bought the de-shelled salted egg yolks from the egg store at Chong Pang market which is technically easier.

However, the texture was found to be harder than usual. A few things to note for future references; i saw a few recipes spraying the yolks with sesame oil / rice wine and / or then baking them (at 170 degrees celcius) for about 8 minutes. Leave them to cool.

Line the trays with baking paper! At the same time, i would also wrap my table with cling wrap for ease of cleaning up after the preparation and molding session.  

Mix your favourite paste with melon seeds! Our family's favourite is the white lotus paste from Phoon Huat and as we enjoy melon seeds, i am super generous on the amount to put in! By the way, do mix them real well.

Shape the filling mixture into balls; as per ratio indicated somewhere in the beginning of this blog, it's 125 grams for the large mooncakes. If you are putting in salted egg yolk, do be mindful to deduct the weight too; typically around 10 grams for one yolk. 

Two hours are up and the dough is ready!
Switch on and preheat your oven to 170 degrees celcius.

Sprinkle some plain flour on the clean table and put the now-pliable dough on them. If the dough is a tad sticky, just mix in some flour. No measurement here; just use your hands to 'feel'.

Divide and shape them into 50-gram balls. As you can see, i have the tendency to prepare everything first for efficiency. It would be easier if you have another pair of hands but i have done it alone and it's seriously easy once you get the flow.

Start of the molding; given the hot weather we have in Singapore, it can be hard to roll the dough into a round, flat disc. To make it easier, cut a piece of cling wrap. 

Put the 50-gram dough in between the cling wrap, cover with cling wrap and use the rolling pin to flatten it! The dough doesn't stick to the pin and you can get it real thin! 

Take the 125-gram filling, put it in the middle of the flattened dough and wrap it up. If you have rolled up the dough into quite a large piece, you should be able to cover up the entire filling. 

That's it; ready to be put into the mold! 

An important step - dust the wrapped dough with plain flour and roll it a bit more using your hands. You can also dust the insides of the mold as this would ease the removal later.

Insert the wrapped dough into the mold.

You have to press the wrapped dough in so that it can reach the innermost section but do not force your worse through. After which, press the sides of the mold pattern; this would ensure your mooncake doesn't have that unsightly bottom edges. 

Plunge out the molded mooncake! I have used both traditional wooden molds and the now, more popular plastic plunger molds. Which one do i prefer? Obviously, the plunger although traditionalists swear by the wooden ones.

Hold the molded mooncake using your palm and give it a light, gentle twist. Too hard and you would get a mooncake with distorted sides.

Ta-dah! Beautifully molded mooncake that's ready for baking! If the top pattern isn't too defined, you can usually still roll it into a ball and put into the mold again. For harder fillings like the five-nut, it might be harder though.

To prevent cracking, spray the molded mooncakes with plain water! Don't attempt to spray too much as it would result in blurring the surface pattern of the mooncakes.

Put the tray in the middle of the preheated oven and bake for 20 minutes. Some recipes said to put them into the second upper level but they tend to brown too quickly.

After 20 minutes, take out the mooncakes from the oven and leave them to cool for 15 minutes. In that 15 minutes, prepare the egg wash and once the 15 minutes are up, glaze the top and side of the mooncakes; a light brush would do. Too much and the pattern would become fuzzy. Throw them back into the oven (second upper layer) and bake for another 10-15 minutes.

Leave them out to cool completely after they are done (and sufficiently browned). To quicken the process, i switch on the air-conditioning and fan in my living room.  

This would be another important step so that the mooncakes would look nicer as gifts. Consolidate all the cooled mooncakes and put into a box.

Seal them well and keep for about 3 days. This would allow a process known as 回油 (return of the oil) which would result in a nicer sheen and better texture for the mooncakes.

Yummy, with tons of melon seeds!